


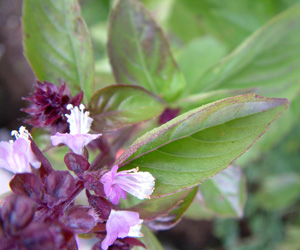
Cinnamon basil is a colorful and fragrant addition to the garden.
You may say “bayzil” and I may say “baa-zil,” but I hope that we agree on one thing, basil is a must-have in the garden and kitchen.
Juicy, sun-warmed tomato chunks mixed with olive oil, freshly picked basil and garlic spooned over hot pasta is truly a feast sublime.
And what’s pesto without fresh basil?
It wasn’t that long ago that growing your own basil, or getting basil plants purchased at the garden center to survive in your garden was a very iffy proposition. It turned out that a large percentage of the seed and plants being sold was doomed to fail because of the presence of a seed-transmitted disease. At one point, we all thought that this was an herb to be grown only by the horticulturally-gifted. But once the seed suppliers and breeders became aware that the problem was on their end, they were able to develop new seed stocks. And basil has been booming ever since.
Besides having extraordinary flavor, basil is incredibly easy to grow, unless you plant it outdoors too early. Not only does it add to the herb garden or tomato plantings, but the numerous shapes, sizes and textures make excellent additions to any garden, shrub border or container garden. There are so many things to do with basil plants. Tuck them into unused garden corners, display them among vegetables, edge a flower garden or plant them as an aromatic ground cover along a path where they gently release a pungent, anise scent when brushed against.
Basil even grows fairly well indoors on a windowsill or under fluorescent lights.
Smaller basil cultivars make superb edging for the perennial border or vegetable garden, or even as a handsome foliage contrast in containers of flowers. Plant large, maroon-leafed basil between ruby lettuce and leeks for a splash of bright color. Cinnamon basil and orange-scented geraniums in a sunny container radiate the scent of warm orange cinnamon rolls. Or use basil as a foil for bright annuals or summer-flowering bulbs in pots or baskets.
The seed racks, catalogs and garden centers are full of amazing varieties. There are sweet, scented, Italian, Thai and Greek basils, each with a different leaf shape and flavor.
Most edible basils are cultivars of the species
Ocimum basilicum
. The smooth-leaved types that grow 2 to 3 feet tall are the best known for culinary use. We start the seeds for these types indoors in early March and do successional sowings through late June. So, there’s still time to start some, and not to worry, local garden centers have everything from cell packs up to large pots of mature basil ready for your garden.
There are also highly-perfumed, crinkly-leaved and ruffley-leaved varieties, all of which make superb pesto and double as a smashing focal point in the landscape.
Opal basil’s deep red to purple leaves display a striking color contrast to green, gray and blue leaf plants in the perennial border. Culinarily, they make beautiful soft pink sorbets and vinegars. Although their flavor is superb, be cautious about using them in delicate-colored foods such as chicken or white cream soups as their color may lend a dark purple or gray color to food, not very appetizing by most standards.
In contrast to the large types, the tiny-leaved basils produce small, 6-inch mounds and are unmatched as edging plants. These small globe basils have a delicate flavor that is best used fresh.
For an entirely different taste, try a scented basil such as cinnamon, anise or lemon.
Thai basils, fairly new to the American market, have deep maroon-tinged leaves on purple stems and whorls of intense purple flowers. Although the concentrated anise flavor may overpower all but the strongest foods, this is one of the most beautiful basils for use in the landscape.
Holy basil, a different species than culinary basil, is a sacred herb in the Hindu religion. Like many of the other scented basils, its fuzzy leaves are used for tea.
As for conditions, basil asks for nothing more in the garden than full sun, well-drained soil and warmth. Too often gardeners will plant it too early and it just languishes in the cold soil and never seems to revive. It doesn’t need much, if any, fertilizer and it will die at the first hint of frost.
Disease and insects shouldn’t be a problem, but keep a careful eye out for spider mites on the underside of the foliage. These mites will multiply very quickly when it becomes hot and dry in July and August. But twice weekly sprays of strong, but fine water on the undersides of the leaves will control the mites very well.
Basil is harvested just as the flower buds begin to form, when the leaves contain the most concentrated oils and provide the best flavor and fragrance. Once the plant begins to expend energy on flowering and seed production, the flavor rapidly deteriorates.
Cut or pinch sprigs just above a leaf or pair of leaves, removing no more than a quarter of the plant at each picking. Seed-started plants that are sown in early March can have their first trimming indoors in mid-May and again outdoors two to three weeks later.
Simple air-drying produces tasty basil for use all winter. Rinse the leaves in cool water and gently shake off extra moisture. When thoroughly dry, tie a handful of stems firmly into a bundle. Place the bundle in a paper bag, gathering the top of the bag around the stems and tying again. Then, label and hang the bag in a dry place (out of sunlight) where the temperature doesn’t get above 80 degrees. After two to four weeks, the herbs should be dry and crumbly.
To oven-dry, place the leaves on a cookie sheet and put into a 180 degree oven for three to four hours, leaving the door ajar.
In the microwave, heat the herbs on a paper towel or paper plate for 15 to 30 second intervals for a total of one to three minutes. Turn or mix as needed until dried.
Once basil is dried, store it in an air-tight container in a cool, dark cupboard. Keep the leaves whole, if possible, to preserve the oil, and crush or grind only when you use them.
The best way to preserve the just-picked flavor is to freeze basil in water or olive oil. Put a handful of washed leaves in a food processor or blender with enough water or oil to make a slurry. When processed, pour into ice cube trays. Make sure each cube has enough water to cover the chopped leaves, then freeze. Once frozen, turn out the cubes and store in a well-labeled freezer container.
Basil vinegar is a staple in many kitchens for salads, sautés and marinades. To make basil vinegar, simply fill a jar with washed leaves and pour cold cider vinegar over them (use white vinegar to take advantage of the pink color of opal basil). Tighten the lid and set in a warm pantry or on a sunny windowsill for three to four weeks. Then strain the vinegar into decorative bottles and add a sprig or two of fresh basil for decoration.
When wintertime comes, you can grow basil indoors in a sunny spot that gets at least four hours of sun each day, or under artificial lighting if natural sunlight isn’t available. Use a porous potting soil and keep it relatively moist, but not wet.
The plants will not get very large or sturdy, but if you clip regularly and sow seeds every two to four weeks, you’ll have fresh basil from October until you pick it in the garden again next June. Your soups, pasta, salsa and pesto will appreciate it.
And by all means, keep growing.
Andrew Messinger has been a professional horticulturist for more than 30 years. He divides his time between homes and gardens in Southampton, Westchester and the Catskills. E-mail him at: Andrew@hamptongardener.com. The Hampton Gardener is a registered trademark.


 27east on Jun 2, 2009